

Have you ever wanted to build your own MetaTrader 5 Expert Advisor? Took a dive into MT5 EA’s and thought, “Far out, this is flippin’ hard!”
Meanwhile, you’re thinking to yourself, “I really need to get in on this autotrading stuff”
If that’s you, then this series is for you.
About This Series
In this series, I cover everything you need to build your own advanced Expert Advisor from scratch. I cover:
- How to get started
- Using built in technical indicators from MetaTrader
- Making your EA autotrade
- Adding some simple-yet-powerful risk management techniques to your EA
- Backtesting and Optimizing your soon-to-be-awesome algorithm
- Adding some advanced features
All of the code that I use is available on my public GitHub repo, and each episode contains working code snippets you can immediately use in your own trading bot.
If you’d like some more general help, join our Discord server here, and if you prefer content in a video format, you can check out my YouTube channel here.
Working Code on GitHub
You can get all the working code for series, and more, on my GitHub here.
 jimtin
In This Episode
By the end of this episode, you’ll have an expert advisor up and running, printing the current price of an asset to your Experts tab on MetaTrader.
What You’ll Need to Complete this Episode
- All your settings correct for autotrading on MetaTrader 5. Follow this article, or this YouTube video to see how.
- Your development environment set up. If you’d like to set up an advanced development environment with the latest in AI pair programming, checkout this article, or this YouTube video to see how.
- A MetaTrader 5 account to use. I strongly recommend a paper trading account.
Getting Started
We’re going to start by creating the file for our Expert Advisor. This file will ultimately be compiled into your EA — but for now, it’s just a file.
Follow these steps:
- Go to your
Advisorstab / folder - Right click
- Click ‘New File’
- Type in the name you’d like to give your trading bot, ending in the file extension
.mq5. I called minersi_trading_bot_tutorial.mq5
You should now have a blank file called rsi_trading_bot_tutorial.mq5
Expert Advisor Framework
Next, we’re going to add in the framework for our Expert Advisor. For our purposes, we’re going to include four parts:
- A title section, because why not?
- An
OnInit()function that specifies what is going to happen when the trading bot starts - An
OnDeinit()function that specifies what actions to take when the trading bot stops - An
OnTick()function that specifies what actions to take every time a trade or ‘tick’ occurs (not to be confused with price ‘ticks’) which are something totally different.
Title Section
The title screen allows you to outline some information about your trading bot. I’ve kept mine a bit fun, you can do whatever you’d like with yours. Here’s what mine looks like:
//+------------------------------------------------------------------+
//|                                  RSI_EA_from_TradeOxy.mq5        |
//|                              AppnologyJames, TradeOxy.com        |
//|                                  https://www.tradeoxy.com        |
//+------------------------------------------------------------------+
To add yours, simply put this right at the top of your file and modify the text inside. Have fun making all the lines and + line up 😢
The OnInit() Function
The OnInit() function specifies what your EA should do every time it starts (initializes). You can do all sorts of things here like load up variables, print information to the screen or perform some kind of complex super trader calculation. At the end of the function, you need to return an INIT_SUCCEEDED flag so that MT5 knows the bot started successfully.
For this article, we are going to print a nice welcome message to our Experts tab. In later articles we will make more extensive use of this feature.
Add the code below to your file:
//+------------------------------------------------------------------+
//| Expert initialization function                                   |
//+------------------------------------------------------------------+
int OnInit()
{
    // Print the name of the Expert Advisor and a Welcome message
    Print("RSI Trading Bot Expert Advisor from TradeOxy.com");
    // Return value of initialization
    return(INIT_SUCCEEDED);
}
The OnDeinit() Function
As you might expect, the OnDeinit() function is called whenever your EA stops working (Deinitializes). It can be quite a useful way to figure out the reason that your EA stopped working — particularly if it wasn’t on purpose!
Once again, I’ll keep this pretty simple. Add the code below to the bottom of your Expert Advisors file.
//+------------------------------------------------------------------+
//| Expert deinitialization function                                 |
//+------------------------------------------------------------------+
void OnDeinit(const int reason)
{
    // Deinitialization code
    Print("Expert advisor deinitialized. Reason: ", reason);
}
The OnTick() Function
The OnTick() function governs the actions your Expert Advisor should take every time a new price movement happens. Confusingly, these are called ticks, and they are different from the price ticks, which refer to the smallest possible change on the right side of a decimal point.
For most EAs, the OnTick() function is the primary method of driving your bot. It is the function that fires the events that lead to decisions that lead to trades on your behalf.Let’s start by setting up the simplest of OnTick() functions. All the code below will do is print “A Tick Happened” each time a tick happens.
Here’s the code:
//+------------------------------------------------------------------+
//| Expert tick function                                             |
//+------------------------------------------------------------------+
void OnTick()
{
    Print("A Tick Happened");
}
Compile Your Code
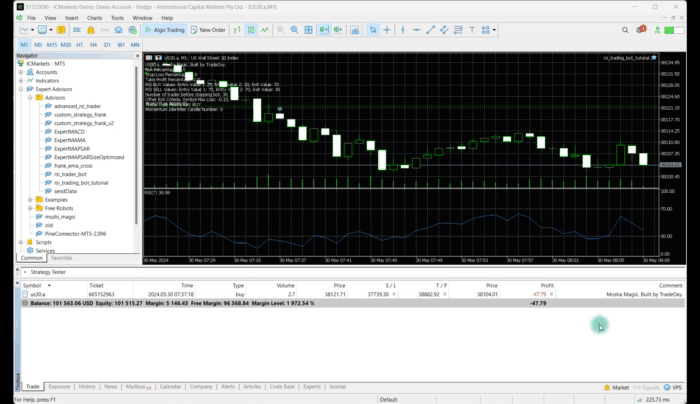
Go ahead an compile your code. There should be no errors or warnings.
Now, add it to your chart. You can follow this video if it’s helpful.
If you go to your Experts tab on MT5, you should see something like the below happening:
Getting Some Price Information
Now that we’ve got some action happening on the EA, let’s get some information that’s a little more useful.
A great piece of information might be the current close price of whatever candle you are looking at. This can be a great way to look at the current price of the candle, while also diving a little into the MQL5 Language Reference.
To do this, we will be using the iClose() function. According the MQL5 Reference, the iClose function “returns the price of the bar (indicated by the ‘shift’ parameter) on the corresponding chart.”
In normal human language, this means:
When your EA is on a chart, the iClose function will give you the current closeTo do this, update your OnTick() function as follows:
//+------------------------------------------------------------------+
//| Expert tick function                                             |
//+------------------------------------------------------------------+
void OnTick()
{

    double close = iClose(_Symbol, _Period, 0);
    Print("Close Price: ", close);
}
Go ahead and compile your updated code. You should get no errors and no warnings.
If you head back to your MT5 terminal, you should now be seeing the following in your MT5 Experts tab:
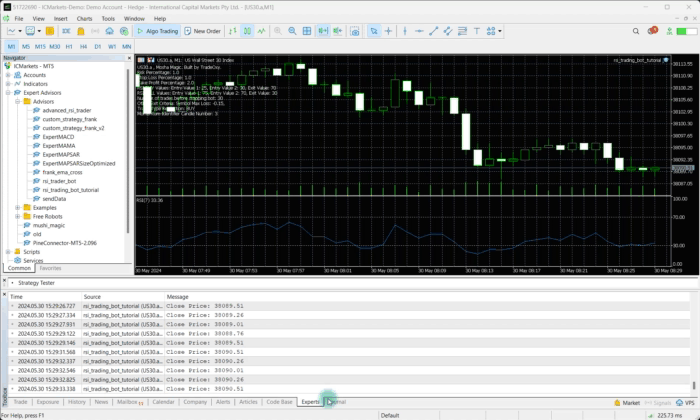
Pretty cool
Up Next!
Gratz on getting your EA up and running! If this is your first one, double 👏!
In the next episode, I’m going to show you how to get one of the most popular indicators in the world into your EA — the RSI.
List of Articles in this Series
- Build Your Own AutoTrading MetaTrader 5 Expert Advsior
- The Easiest Way to Add the RSI Indicator to Your MetaTrader 5 EA
- The Easiest RSI Algorithm for Your MetaTrader Expert Advisor
- The Easiest Way to Place BUY and Sell Orders with your MetaTrader EA
- The Simplest Way to Manage Your Expert Advisor Trades on MetaTrader
- Four Simple Steps to Backtest and Optimize Your EA on MetaTrader 5
Connect With Me
My name is James, and you’ll often see me online using the AppnologyJames handle. Although my background and training is in Cyber Security, I’ve spend the last few years building trading algorithms for clients, along with a powerful market analysis platform called TradeOxy.
I love hearing from my readers and viewers, so feel free to reach out and connect with me:
- On YouTube
- Through TradeOxy
- On my Discord Channel
- On LinkedIn
Full Code for Episode 1
//+------------------------------------------------------------------+
//|                                  RSI_EA_from_TradeOxy.mq5        |
//|                              AppnologyJames, TradeOxy.com        |
//|                                  https://www.tradeoxy.com        |
//+------------------------------------------------------------------+


//+------------------------------------------------------------------+
//| Expert initialization function                                   |
//+------------------------------------------------------------------+
int OnInit()
{
    // Print the name of the Expert Advisor and a Welcome message
    Print("RSI Trading Bot Expert Advisor from TradeOxy.com");
    // Return value of initialization
    return(INIT_SUCCEEDED);
}

//+------------------------------------------------------------------+
//| Expert deinitialization function                                 |
//+------------------------------------------------------------------+
void OnDeinit(const int reason)
{
    // Deinitialization code
    Print("Expert advisor deinitialized. Reason: ", reason);
}


//+------------------------------------------------------------------+
//| Expert tick function                                             |
//+------------------------------------------------------------------+
void OnTick()
{

    double close = iClose(_Symbol, _Period, 0);
    Print("Close Price: ", close);
}