Ready, Set, Solana! Getting Your M1 Mac Ready for Web3 dev with Solana and Rust
You’re ready to get going on blockchain. You’ve done your research (or maybe just went with something which looked interesting) and selected Solana to do your learning on.
Super cool! Solana is an amazing blockchain with a lot to recommend it. It’s blazingly fast, boasting one of the highest Transactions Per Second (TPS) at the time of writing. It’s written in Rust which is an elegant, beautiful and memory safe language.
You’ve made a great choice.
At the time of writing, Solana and M1 chips don’t play nicely together. I kept finding weird and annoying errors any time I tried to test my code. Here’s how I set up my Mac.
Here’s the error I got trying to run solana-test-validator and solana-test-validator --no-bpf-jitzsh: illegal hardware instruction solana-test-validator
Here’s how to fix it.
Install Rosetta 2
Rosetta 2 is the interpretation layer for interpreting x86 instructions into ARM instructions. The good news is that Apple has done an excellent job with Rosetta 2. You’ll barely even notice you’re using it.
Go to your Utilities folder and make a copy of the Terminal app
Rename your copied Terminal app ‘Rosetta Terminal’
Install Rosetta into your Rosetta Terminal application
For the rest of this tutorial use your Rosetta Terminal
Install Brew in Different Location
Not everyone I came across online had this issue, but I certainly did. I had Homebrew installed on my M1 already, but I had to install it in a different location.
Here’s the error I got:Error: Cannot install under Rosetta 2 in ARM default prefix (/opt/homebrew)!To rerun under ARM use:arch -arm64 brew install …To install under x86_64, install Homebrew into /usr/local.
Here comes the exciting moment we’ve been working towards. Getting Solana working effectively on our M1 Macs.
Create a stable directory where you can store your code. For instance, I have a Learning folder. You can replace the Learning name with whatever works for you -> mkdir ~/Learning
Navigate into the new solana directory -> cd solana
Use Cargo to compile the Solana source code (note this takes a bit of time) -> cargo build
Now run the install script. This takes ages, so once you’ve got it running, grab a coffee and come back ./scripts/cargo-install-all.sh .
Update your path so your Rosetta Terminal knows where to find your Solana CLI commands -> export PATH=$PWD/bin:$PATH
Phew. That part probably took you a solid 30 minutes of install time (or maybe it’s a couple of years later and it only took 5 mins. I’m jealous :P )
Let’s Check It’s Working
This is the moment of truth. Did our steps work?
Check if you can at least get a response to solana -> solana
If it’s working you should get a bunch of options read out
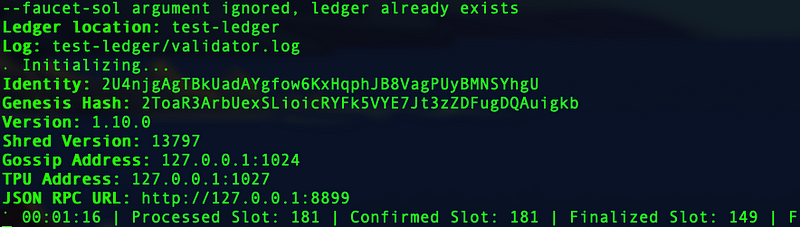
Okies. Deep breath. Let’s try it: solana-test-validator
If it’s working, you’ll get the following:
Whew. What a relief!
A Couple of Recommendations
If you’re looking for some learning recommendations, I’d really recommend buildspace. Their courses are fun, interactive, useful and above all insightful.
Specifically for Solana I’d recommend Build a Web3 app on Solana with React and Rust. It’s a brilliant course which walks you through the basics, and by the end you’ll have deployed your first thing on a blockchain (Solana). Plus it’s an easy introduction to Rust and React.
A Personal Ask
If you found this content helpful, I’d love it if you could connect, clap and share the article. It means a lot ❤
Share this post
The link has been copied!
Your link has expired. Please request a new one.
Your link has expired. Please request a new one.
Your link has expired. Please request a new one.
Great! You've successfully signed up.
Great! You've successfully signed up.
Welcome back! You've successfully signed in.
Success! You now have access to additional content.